5 Yoga Backbends That Can Help Improve Your Posture

In yoga, we categorize poses into four different types, based on the position of your spine. In backbends, we extend the spine; in forward bends, we flex the spine; in side bends, we flex and extend the spine laterally; and when we do twists, we draw the spine into rotation.
The majority of our habitual daily activities—sitting at a desk to work at our computers, driving, eating, reading a book, using our phones and riding our bicycles—take place in a mild forward bend, and this is why backbends are so crucial. Backbends offer a counterpose.
How backbends can improve your posture.
The human body is an adaptation machine. Throughout your life, it develops to make you optimally efficient at the activities that you spend the most time doing. Unfortunately, in terms of posture, this generally leads to a shortening and tightening of the muscles in the front of your body and a lengthening and weakening of the muscles in the back of your body.
We round our backs, allow our heads to jut forward, and keep our hips almost permanently partially flexed. Over a long enough timeline, holding our bodies out of optimal alignment in this way can lead to lower back and neck pain, pain in between the shoulder blades, and short, shallow breathing. And this is where a consistent backbending practice comes in.
Benefits of backbends for your alignment and muscles:
- Backbends open up the front of the body—the chest, fronts of the shoulders, muscles in between the ribs (intercostals), abdominals, and hip flexors.
- Backbends strengthen the back of the body—the muscles along the cervical (neck), thoracic (mid-back) and lumbar (lower back) spine as well as the rotator cuffs, glutes, and hamstrings.
- Backbends improve spinal mobility—especially in the mid-back where the spine can get "stuck" from chronic flexion (rounding forward).
Tips for successful, pain-free backbends.
As healthy and as therapeutic as backbends can be, please be careful. There are conditions, including spinal stenosis and spondylolisthesis, that can be exacerbated by bending the spine back and compressing the lumbar spine. Please check with your doctor if you have any concerns before trying!
It's crucial that your muscles are fully warmed up before you jump into these poses. I don't recommend that you practice backbends in the morning or directly after a long period of time in which your spine is rounded forward.
The stiffest part of the spine is typically the thoracic (mid-back). If you experience pain in backbends at your lower back from hyperextension or compression, try to even up the curve by focusing on increasing the spinal extension at this stuck point.
Here are five backbends that can help improve your posture, in order of difficulty. Pick just one or two to practice at a time.
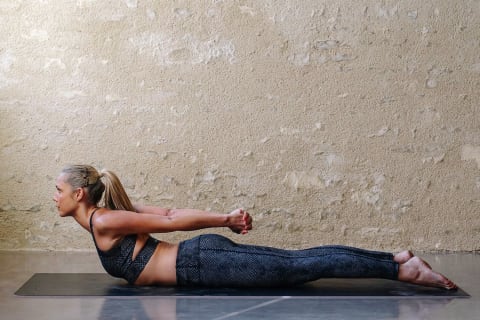
Snake Pose
Benefits
- Opens up the fronts of the shoulders and the chest.
- Strengthens the hamstrings, lower back, mid-back, and the back of the neck.
- Can help alleviate pain in between the shoulder blades.
How To:
- Lie facedown with your arms by your sides and your feet hip-width apart.
- Interlace your fingers behind your back.
- Inhale, lift your head and chest up a few inches.
- Exhale, draw your shoulders back.
- Engage your lower abs to support your lumbar spine. Look down at the mat or straight ahead.
- Squeeze your shoulder blades together and keep drawing your shoulders back.
- Hold the pose for 3 to 5 breaths, in and out through your nose.
- Take a deep breath in.
- Exhale, release the pose, rest one cheek on the mat, and rock your hips from side to side to release your lower back.
- Repeat 2 to 3 times.
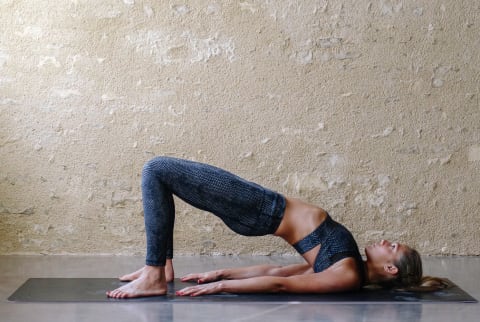
Bridge Pose

Benefits
- Opens up the hip flexors, abs, chest, front of the shoulders, and back of the neck.
- Strengthens the hamstrings, glutes, and lower and upper back.
- Improves spinal mobility.
- Can help alleviate lower and upper back pain.
How To:
- Lie on your back with your knees bent and your feet flat on the mat, hip-width apart. Check that your toes point straight ahead.
- Rest your arms by your sides, palms facing down, and walk your feet back until your fingertips graze your heels.
- Inhale, press into your feet, engage your abs, and lift your hips all the way up.
- Exhale, relax into the pose.
- Check that your knees point straight ahead and do not fall out to the sides or in toward each other.
- Relax your glutes to avoid compressing your lower back.
- Hold the pose for 3 to 5 deep breaths, in and out through your nose.
- Take a deep breath in.
- Exhale, lower slowly back down to the mat.
- Bring one hand to your belly and one hand to your chest.
- Walk your feet to the edges of the mat and drop both knees slowly to the right and to the left.
- Windshield wiper your knees a few times to release your lower back.
- Repeat 2 to 3 times.
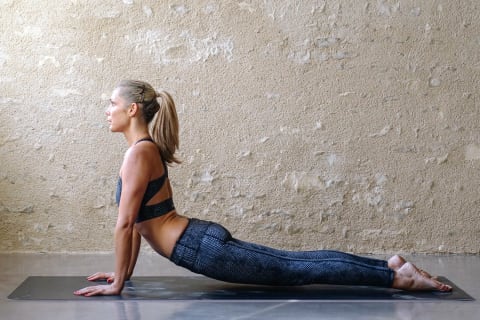
Upward-Facing Dog
Benefits
- Improves spinal mobility.
- Strengthens the hands, wrists, arms, shoulders, back, and legs.
- Stretches the hip flexors, abs, and chest.
How To:
- Lie face down on your mat with your hands underneath your shoulders and your feet hip-width apart
- Spread your fingers wide and press the tops of your feet into the mat.
- Inhale, hug your elbows into your sides, draw your shoulders back, and push your upper body off the mat until your arms are straight and your thighs and knees lift up.
- Exhale, relax into the pose.
- Your shoulders should come directly above your wrists.
- Press into your hands, draw your shoulders back, and keep your neck long.
- Draw your ribs in to protect your lower back. Hold the pose for 3 to 5 deep breaths, in and out through your nose.
- Take a deep breath in.
- Exhale, release the pose, rest one cheek on the mat, bring your arms by your sides, and rock your hips from side to side to release your lower back.
- Repeat 2 to 3 times.
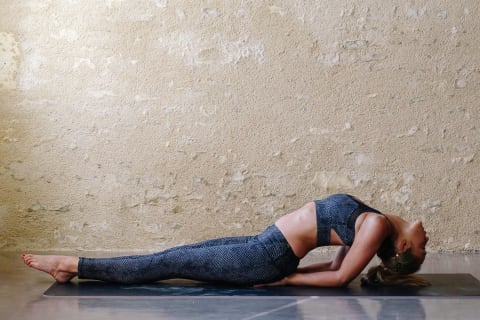
Fish Pose
Benefits
- Stretches the abs, intercostals, chest, shoulders, and throat.
- Increases spinal mobility.
- Strengthens the mid-back.
How To:
- Lie on your back with your feet together.
- Lift your hips and bring your hands underneath your sacrum, palms facing down.
- Draw your elbows in toward each other and point your toes.
- Inhale, push into your hands and forearms and lift your upper body off the mat.
- Exhale, drop your head back.
- Keep pressing into your forearms and lifting your chest up. There should only be a minimal amount of weight resting on your head or none at all.
- Hold the pose for 3 to 5 breaths, in and out through your nose.
- To come out of the pose, inhale, push firmly into your hands and forearms, lift your head up.
- Exhale, look at your toes and lower slowly back down to the mat.
- Release your arms out from underneath you.
- Repeat the pose 2 to 3 times. Then hug your knees into your chest and rock gently from side to side.
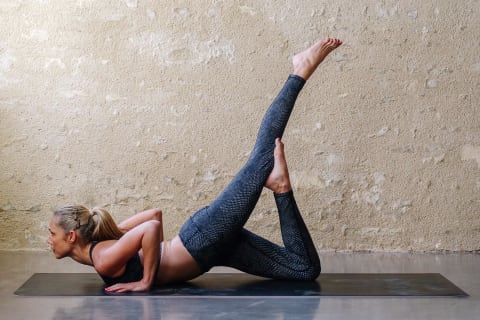
Flying Locust
Benefits
- Stretches the chest, shoulders, abs, and hip flexors.
- Increases spinal mobility.
How To:
- Lie facedown on the mat with your hands underneath your shoulders.
- Draw your elbows in.
- Inhale, look up and lift your chest a few inches off the mat.
- Exhale, bend your right knee, lift your left leg all the way up, point your toes, and rest the top of your left thigh on the sole of your right foot.
- Press down evenly into both palms, spreading your fingers wide.
- Be careful not to compress your lower back or the back of your neck.
- Draw your shoulders back.
- Hold the pose for 3 to 5 breaths, in and out through your nose.
- Take a deep breath in.
- Exhale, release the pose, and repeat on the other side.
- Then push your hips back to your heels and rest for 3 to 5 breaths in child's pose.

Abi Carver is deeply passionate about sharing the practices and philosophy of yoga. She has completed two 200-Hr Yoga Alliance Teacher Training, is a NASM Qualified Personal Trainer, and lives wherever the winds take her. Her video series, Yoga 15, clarifies and simplifies ancient yogic techniques to make the practice accessible to a new audience of men and women, constantly looking for ways to improve the lives of themselves and those around them. She believes that yoga is one of the most powerful tools to ease the physical aches and pains we encounter in modern life and bring us into a state of calm, clarity and creativity. Follow her on Instagram for yoga tips, inspiration and motivation.